Arts and Crafts Day: Fun with Architectural Salvage
This weekend Jonathan and I had a chance to get out of the house for a bit and do a little treasure hunting. Once we found our treasures, we got to have a fun arts and crafts day. We love anything DIY. We kind of can’t help ourselves. It’s a bit of an addiction.
We had heard of a store in Front Royal that bought and sold old architectural house pieces. We’d wanted to get there for some time, and this past weekend was our chance. Once there, looking at all the wonderful, historic pieces our minds began to swirl.
We had a vague idea that we wanted to update some of the art in the rooms and maybe incorporate a three dimensional piece. We must have come up with a half dozen or more ideas while we browsed the aisles of the big, chilly warehouse, but finally we decided upon an idea and proceeded to just purchase one item for the time being. Often, we find ourselves mired in more than one project at a time and ultimately we felt now would not be a good time to get bogged down. One, simple, do-able project seemed fine to us!
However, as we are prone to do, one crafting project turned into two. Okay, turned into three.
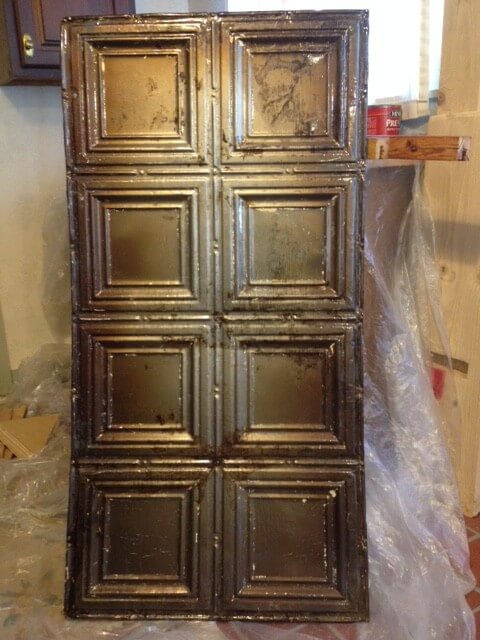
Let’s break this out. So, the fun piece we bought at Architectural Old House Parts was a beautiful piece of tin that had once been part of a ceiling. Nearly all the paint had come off the piece as it had never been properly primed before painting. Good for us! And it only had a bit of superficial rust that could easily be cleaned off. All in all, the look and wear on the piece was quite wonderful.
Jonathan scrubbed it with some steel wool which got most of the rust and then we gave it a quick wash and dry. Finally, we applied a rust inhibitor to the tin. With some lumber from the garage, Jonathan built a frame for the back. All that’s left to do now is attach the tin to the frame and then we can hang it on the wall. We think this will be a great piece in our parlor.
The second project for the weekend started out as a simple fix-it. I have a full length mirror in one of the guest rooms, and I noticed last week that one of the legs had developed quite a nasty crack. After Jonathan examined it, he determined he could get it to hold back together, but that the best course of action would be to look for a new mirror.
I started a Google search, trying to locate a similarly sized piece, when it occurred to me that we had an unused mirror stored in the garage. When we updated the Shore Room in the winter of 2013/2014 we removed a long antique mirror from above the old “headboard” in the room. The frame had come apart from it, and we had planned on donating the mirror, but hadn’t yet done so. Could we make our own new frame, I asked Jonathan, and use this as our new floor mirror? Well, after a quick inventory of the rest of the lumber, he found some pieces that were actual beams from the house from when we remodeled the kitchen ceiling in winter 2012! Win, win, win! Free mirror made with pieces already from the house. A perfect reuse and recycle opportunity.
Jonathan and his trusty table saw made a channel in the wood beams to frame out the mirror and he coated the wood in clear polyurethane. Once the poly dries, he’ll assemble the frame to the mirror.
Our final crafts project for the weekend was a fun little thing I had wanted to get to for a while. I get lots and lots of maps here so that I can keep them available for guests. The Virginia Department of Transportation is great at sending those out upon request. Not too long ago I got some updated versions, so I had a pile of old maps. I thought, what if I could create a fun little souvenir for our retail shelf using the Berryville bit of the map? So, I purchased a few craft supplies to make cute magnets and key chains. Once the map parts are cut to size, they are sealed with a simple Mod Podge glue. The same glue is used to adhere the maps into the magnet base – a bottle cap, in this instance. The final step will be to mix and pour a jeweler’s resin into the cap which will actually magnify the image underneath a bit.
So, we are about three quarter of the way done with all three projects. Not bad for one weekend! I’ll show you all the finished projects really soon, but for now, here are a few working photos to spark your interest.
-

- Salvaged Tin
-
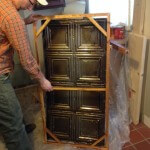
- Frame for Tin Wall Art
-
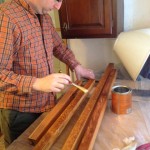
- Mirror Frame
-
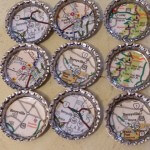
- Map Magnets – arts and crafts

You guys rock!